Blog Index

Cubby House Project – 05 Frame Construction

Your ads will be inserted here by

Easy Ads.

Please go to the plugin admin page to set up your ad code.

Back wall frame built 26 December 2014 and clamped onto the floor board for size.  Noggins were added later for support.

IMG_3726.JPG

IMG_3728.JPG

29 December 2014

Wall frames with windows (500x500mm) stacked together with the back wall frame (with the noggins fitted.  All noggins were aligned for the fitting of the two sheets of ply.

IMG_3739.JPG

Your ads will be inserted here by

Easy Ads.

Please go to the plugin admin page to set up your ad code.

30 December 2014

Frame for the front wall

IMG_3744.JPG

Assembled with kids.  The door frame (1235mm) is just taller then my 7 year old, and the windows allows my 4 year old to see over the sill.

IMG_3746.JPG

Your ads will be inserted here by

Easy Ads.

Please go to the plugin admin page to set up your ad code.

Cubby House Project – 04 The Floor Part 2

Your ads will be inserted here by

Easy Ads.

Please go to the plugin admin page to set up your ad code.

23 December 2014 – Replacing Pavers with Posts

Marked out the location of the holes with tent pegs while the floor was in position.  Had measured the height of each stack of pavers, which would be added to my minimum pole height.

IMG_3688.JPG

Started playing minecraft for real.

IMG_3690.JPG

IMG_3693.JPG

Preparation time, ~ 4-5 hours

26 December 2014 – Setting of Posts

Trip to Bunnings for:

  • 4 x 1.8m treated pine posts (100mm diameter)
  • 6 bags post-crete
  • More structural pine lengths (~12 x 2.4m lengths)

Scott gave me 2 x 1.8m pine posts.  Had all the measurements to get all posts within 100mm of each other….but stuff it, cut them all in half.

IMG_3722.JPG

IMG_3724.JPG

Your ads will be inserted here by

Easy Ads.

Please go to the plugin admin page to set up your ad code.

Managed to get set 8 out of 12 posts before the day ended.  The floor wasn’t 100% square, and distance between the bearers differed between the front and back.

IMG_3727.JPG

Construction time ~ 4 hours, not including the excursion to Bunnings in the morning.  I did manage to build the back wall frame in this time too.

29 December 2014

Dad helped build the two side frames.  The first 8 posts were cut to a level height.  We also lined up and set the last four posts in concrete.  Rained a bit and had these last four posts covered with a tarp.

Construction time ~5 hours.

30 December 2014

A real day of action today, starting with cutting the last four posts:

IMG_3741.JPG

Positioning the floor, and then nailing in cyclone straps on each of the outer posts.

IMG_3742.JPG

Duration for the morning ~2 hours.

Your ads will be inserted here by

Easy Ads.

Please go to the plugin admin page to set up your ad code.

Cubby House Project – 03 The Floor Part 1

Your ads will be inserted here by

Easy Ads.

Please go to the plugin admin page to set up your ad code.

19 December 2014 – Procurement of first load of materials:

  • 12 x 2.4m lengths structural pine (70x35mm)
  • 2 x 12 mm structural ply (2400x1200m)
  • 2 x 7mm ply (2400x1200mm)
  • 4 x treated pine bearers (90x35mm)

IMG_3659.JPG

IMG_3660.JPG

Non-treated pine lengths (6 x 90x35mm x 3m) from Scott, picked up 13 December 2014

IMG_3661.JPG

Location of the Cubby House

IMG_3662.JPG

Your ads will be inserted here by

Easy Ads.

Please go to the plugin admin page to set up your ad code.

22 December 2014 – Commencement of assembling floor structure

IMG_3677.JPG

IMG_3678.JPG

Mounted on 41 pavers – perfectly level…

IMG_3680.JPG

IMG_3684.JPG

…but not perfectly safe.  The drop was more then I anticipated

Construction time ~ 4 hours

Your ads will be inserted here by

Easy Ads.

Please go to the plugin admin page to set up your ad code.

Cubby House Project – 02 Planning

Your ads will be inserted here by

Easy Ads.

Please go to the plugin admin page to set up your ad code.

Your ads will be inserted here by

Easy Ads.

Please go to the plugin admin page to set up your ad code.

Placeholder for planning info

Your ads will be inserted here by

Easy Ads.

Please go to the plugin admin page to set up your ad code.

Cubby House Project – 01 Requirements Phase

Your ads will be inserted here by

Easy Ads.

Please go to the plugin admin page to set up your ad code.

May 2014

Thoughts on a cubby started around May.  I found a collection of screen captures I had taken on my phone.  For about 6 months it was only thoughts and no real planning had taken place.


IMG_3835.PNG

23-30 November 2014

We had recently let the cat out of the bag to the kids that we were planning to build a cubby house for Christmas.  I thought it would be a good exercise to determine what requirements they had and to see what could be incorporated into the design:

The 4 year old:

IMG_3432.JPG

Design features include:

  • Two levels
  • Beds
  • Lifts
  • Bathroom
  • Work room
  • Study
  • Door
  • Windows
  • Dancing Room
  • Ballet Room (yes, separate to the Dancing Room)
  • 8 Slides
  • Mat

The 7 year old:

IMG_3431.JPG

Design features include:

  • Spy room
  • Bed
  • Lifts
  • Thermometer
  • Mat
  • Dinner room (pie/pizza only)
  • Computer

The daddy:

IMG_3664.JPG

Your ads will be inserted here by

Easy Ads.

Please go to the plugin admin page to set up your ad code.

Design features include:

  • Fort built above sandpit
  • Ability for future expansion for rock wall, slides, ladders

I thought things were getting too complicated.  I was also worried that this was getting too high.

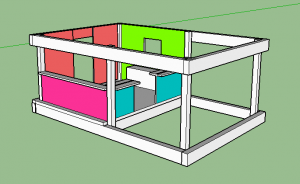
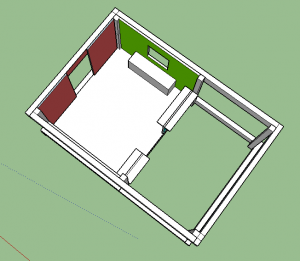
I then tinkered in Sketchup to create a ground level phase 1, that could be built upon in the future:

Image 091 Image 092

Needless to say, I need to simply this fairly quickly, and as outlined in the the next section, created a fairly simple, but large enough cubby that should suit all immediate needs.  I also have the ability to expand if required later (verandah out the front, adjacent fort at a higher level).

Before I settled on the final design, the only burning requirement from the kids was that it was to be big enough to sleep in.  Which means it needs to be big enough for an adult to sleep in.

Your ads will be inserted here by

Easy Ads.

Please go to the plugin admin page to set up your ad code.